Tuesday, March 29, 2011

Natural Vinegar Hair Rinse

http://chagrinvalleysoapandcraft.com/shampving.htm

Why Vinegar?

The use of vinegar with a variety of plants or essential oils for cosmetic purposes
can be traced back to the Romans and was fashionable during
the nineteenth century as vinegar de toilette.

The outer layer of the hair, the cuticle, covers the hair shaft and protects it like the bark on a tree. The cuticle is made of overlapping layers of long scales that lie along the surface of the hair like shingles on a roof. It is the condition of the cuticle scales that determines whether you are going to have a bad hair day. When the cuticle is in good shape, is unbroken, and lies flat, your hair has a smooth appearance. When the layers of the cuticle are tightly knit together, the light is able to reflect off the cuticle. This is what makes hair shine! The cuticle opens when we shampoo our hair. When the cuticle layers are open and not knit together, the hair will feel rough, coarse and brittle. The hair will absorb the light rather than reflect it, which gives the appearance of dull and lifeless hair.


A Bad Hair Day!

Vinegar removes scaly build-up and residue from hair shafts and closes the cuticles. Since residue coats the hair causing it to look dull, removing residue gives your hair more shine. By closing the cuticles, the hair slides more easily and there will be fewer tangles. Vinegar has a tonic action that promotes blood circulation in the small capillaries that irrigate the skin.

The cuticle, covers the hair shaft and protects it like the bark on a tree. If the cuticle scales are laying flat, the hair will look shiny, and a comb or brush will glide smoothly.

If the cuticle stays open it can start a tear in the hair shaft that ultimately leads to breakage of the hair shaft.

What Kind of Vinegar Should I Use?
Although plain white vinegar will work just fine, Apple Cider Vinegar seems to be the favorite hair care vinegar.

Simple Recipe
A good amount to make for long hair is 1/2 tablespoon of vinegar to 1 cup of water. If you want to get fancy, create a vinegar rinse tailored to your hair by adding herbs and/or natural essential oils. I have included an herb and vinegar rinse and an essential oil vinegar rinse that I use below.

How Do I Use The Vinegar Hair Rinse?
After shampooing apply the vinegar rinse.

Now you have a few choices. You may rinse it all out if you want
, or leave the rinse on your hair. I rinse a little--one quick spray of water. Leaving the vinegar rinse on your hair helps prevent tangles in long hair. Since the vinegar restores natural pH it also helps prevent an itchy scalp. As your hair is drying you will smell vinegar, but once your hair dries, no smell. I was skeptical at first--but this really works!

How Often Can I Use The Vinegar Hair Rinse?
Since everyone's hair is different you should use your own judgment on this. Some say that vinegar rinses may be drying if used every day and it is best to restrict use to two times per week. I used a vinegar rinse every other day for the first few weeks--until my hair adjusted to the new shampoo--now once or twice a week keeps my hair healthy and shiny. Many customers have found this regimen to work, but do some experimenting!

Some Helpful Hints
Pouring cold vinegar rinse on your hair in the shower may be a more invigorating experience than you would like. (Although if you're feeling brave, the cold water will give your hair added shine.) Keep a small plastic container of vinegar in your shower. Next, recycle a small clear plastic bottle with a squirt top (your old shampoo bottle may work). Choose the amount of rinse you will need to make for your hair. Mark the vinegar line and water line on your bottle. Now you can pour in the vinegar and add warm water from your shower and squirt the rinse on your hair!

Beauty Secret Facial Toners

Toner #1: Use one teaspoon of cider vinegar and two tablespoons of water.

Toner #2: Use one part apple cider vinegar to three parts witch hazel or rosewater for a gentle toner suitable for all skin types.

Toner #3:
1 cup water (rain, distilled, or spring)
1 heaping tablespoon dried Peppermint or Sage leaves (or 1/4 cup fresh)
3 teaspoons Apple Cider Vinegar (if skin is oily use 2 more teaspoons)

To make an infusion of the peppermint or sage leaves
, heat water until boiling. Remove from heat and add herbs. Cover and steep for 20 minutes. Strain out plant material. Add vinegar and stir well. Pour into a clean bottle and label. Shake well to ensure the mix. Store in refrigerator for best results and use within 3 weeks. Use toner after cleansing.

Use a natural cotton pad to apply the toner to your facial area.

Note: Add a drop or two of lavender or tea tree essential oil to your toner
to fight against blemishes and bacteria.

Fancy Herb & Vinegar Hair Rinse

Rinsing your hair with vinegar after shampooing leaves it shining. Certain herbs can highlight or enhance your hair color, as well as condition it. For example, rosemary and parsley are good for dark hair, sage will darken graying hair, chamomile will highlight blonde or light brown hair, calendula conditions, lavender and lemon verbena add fragrance, linden is good for frequently shampooed hair, and nettles will control dandruff.

This rinse is made from the herbs themselves, not essential oils. You can use either fresh or dried herbs. If you have a rosemary bush handy, use a sprig or two-- each about 5 inches long. For dried rosemary use about a tablespoon. Rosemary is one of the best herbs for hair. Fresh lavender is also nice to use. Most of the herbs you can grow in your garden will probably be useful in some way or other. Fresh herbs are wonderful to use, but do remember to rinse them if they have been sprayed with anything. Cut fresh herbs in the morning after the dew has dried.

If using dried herbs, you can use them either loose, tied up in cheesecloth or muslin fabric, or in teabag form (like one chamomile teabag). If use using loose herbs, you will need to strain your "tea" prior to use (I use a coffee filter)--you don't want to have bits of herb caught in your hair afterwards!

Although there is no need to sterilize equipment, since this is not going to be a food product, clean all equipment thoroughly before starting. Wash in hot, soapy water and rinse well in hot water.

Herb & Vinegar Hair Rinse Recipe #1: This is a quick recipe for one application

Ingredients
  • 2 tablespoon of cider vinegar
  • herbs of choice (see below)
  • about 2 cups of boiling water

Directions:
1) Boil the water in a small saucepan.

2) Add the herbs and vinegar. Cover and allow the "tea" to steep for at least 15 minutes. If you want a stronger herbal infusion, add more herbs, cover and simmer on the stove for 15 minutes. Then turn off the heat and allow to steep for 30 minutes.

3) Allow your infusion to cool. It should be used that day or refrigerated for later use. You may also double or triple the recipe. Just be sure to refrigerate the unused portion.

4) When you have finished rinsing the shampoo out of your hair, pour the rinse on your hair and massage your scalp. If you have very long hair, as I do, you can dip your hair into the jug before pouring its contents over your head. Avoid getting the rinse in your eyes, particularly if you have used essential oils. Also make sure the temperature of your rinse is just right for you.

5) Rinse it out with fresh water or, for extra conditioning benefits, just leave it in and towel dry hair. The vinegar scent will disappear as your hair dries.

6) Make sure you rinse out the shower afterwards, as some herbs can leave it looking slightly tea stained; similarly, watch out for your towels. The staining is only temporary and washes out very easily; it is more likely to occur with extra strong infusions.

Herb & Vinegar Hair Rinse Recipe #2: This recipe makes a larger batch and takes longer to prepare

Ingredients
  • 2 cups of cider vinegar
  • 1 cup chopped herbs of choice (see below)
Directions:
1. Place
approximately 1 cup of chopped herbs in a glass jar.
2. Cover with 2 cups of vinegar.
3. "Steep" this mixture in a tightly closed jar or bottle in the refrigerator or in a dark, cool place for two weeks.
4. Strain steeped vinegar from herbs through cheesecloth or a coffee filter into a fresh, clean bottle.
5. Refrigerate up to 6 months. (I always leave about a weeks worth in my shower!)

Tip: If you don't want to wait two weeks, speed up infusion by heating the vinegar before pouring over herbs. "Steep" for a few days!

When ready to use: dilute 1/2 to 1 tablespoon of the herbal vinegar in 1 cup of water. Rinse through wet hair after shampooing. Rinse it out with fresh water or, for extra conditioning benefits, just leave it in and towel dry hair. The vinegar scent will disappear as your hair dries.

Rose Vinegar:

3/4 cup vinegar
One tablespoon fresh dried rose flowers
One cup distilled water

Heat the rose flowers with the vinegar and water. Bring to a boil and steep for 30 minutes. After cooling , place mixture in a jar with a tight fitting lid and let sit for 2 weeks. Strain the rose flowers from the vinegar and use the liquid for your hair rinse.

Beauty Secret Vinegar Facial Soak: Heat the rose vinegar slowly until it is a comfortable temperature to apply to the skin. Soak a clean warm wash cloth in vinegar and lay over the face for five minutes. Repeat this procedure four times, each time re-dipping the washcloth to reapply. For best results, keep the washcloth on the skin for a total of 20 minutes. This facial soak is an excellent exfoliant and skin stimulant.

Useful HAIR Herbs

Burdock: great for thinning hair, dry, irritated scalp, dandruff, and seborrhea
Calendula
: conditions
Catnip:
Promotes healthy hair growth
Chamomile
: a healing and soothing herb to soften hair,
soothe the scalp, lighten, condition, and stimulate growth
Horsetail: Helps brittle hair due to its high silica content

Lavender: useful for all hair types it stimulates hair growth, and degreases

Marigold: lightens hair color
Nettle: conditions, improves color and texture, helps with dandruff, irritated scalp, and dry scalp
Parsley: enriches hair color and gives a nice luster
Plantain:
great for dry, irritated scalp, dandruff, and seborrhea
Peppermint
: stimulates the scalp
Red Clover:
Rosemary
: excellent for all hair types and problems it acts as a
tonic and conditioner, one of the best herbs to use, gives luster and body, stimulates growth, helps with dandruff, and brings out dark highlights in the hair

Sage: traditionally used to restore color to graying hair, excellent for week hair
Saw Palmetto:
good for hair thinning and hair loss
Thyme
: good for oily hair, dandruff, and
mild hair loss
Witch Hazel: leaves and bark are astringent and cleanse oily hair
Yarrow: for oily hair
Yucca: Navajos swear by yucca root to prevent hair loss and to cure dandruff.

Essential Oils: You may add essential oils to the recipe above (I would suggest adding up to 10 drops of lavender or 5 drops of rosemary essential oil) or use the essential oil hair rinse recipe below. Some words of CAUTION:

  • There are many wonderful essential oils that could be used but you MUST do some research.
  • Essential oils are very strong and many can be skin irritants if not used correctly. Lavender is one of a very few essential oils that can be used directly on skin. Others like clove or thyme essential oil WILL irritate your skin if used full strength. Even though the oils are diluted in this recipe--you must be knowledgeable about the amount of essential oil to use in your dilution.
  • Essential oils are expensive. But do NOT use the cheaper fragrance oils or "nature identical" oils. These are synthetic, can cause skin irritation and provide none of the benefits of natural botanical essential oils.
  • If you are interested in using essential oils click here for some helpful information.

Essential Oil Hair Cleaning Vinegar Rinse

Ingredients: (This makes a large batch that you can use as needed)

  • 2 cups of cider vinegar
  • 10 drops of essential oil (suggestions: lavender, rosemary, clary sage, rose geranium, lemon, or patchouli)

Directions:

  • Mix vinegar and essential oils. This mixture should be stored in a glass bottle since the essential oils may react with plastic.
  • This mixture can be used right away, but if you allow it to sit for a day or two the "flavors" will blend.
  • When ready to use: dilute 1/2 tablespoon of the vinegar/essential oil mixture in 1cup of water.
  • Rinse through wet hair after shampooing. Rinse it out with fresh water or, for extra conditioning benefits, just leave it in and towel dry hair.

  • Monday, March 21, 2011

    How to make a bug-out-bag

    How to Make a Bug Out Bag: Your 72-Hour Emergency Evacuation Survival Kit

    by A Manly Guest Contributor on March 7, 2011 · 191 comments

    in Manly Skills

    Editor’s note: This is a guest post from Creek Stewart of Willow Haven Outdoor.

    The term ‘Bugging Out’ refers to the decision to abandon your home due to an unexpected emergency situation–whether a natural disaster or one caused by man. A ‘Bug Out Bag’ is a pre-prepared survival kit designed to sustain you through the journey to your destination once you’ve decided to ‘Bug Out’ in the event of an emergency evacuation. Typically, the Bug Out Bag (BOB) is a self-contained kit designed to get you through at least 72 hours. This kit is also referred to as a 72-Hour Bag, a Get Out Of Dodge Bag (GOOD Bag), an EVAC Bag, and a Battle Box.

    The thought of having to evacuate your home due to a sudden and imminent threat is not at all unrealistic. The reality is that sudden and uncontrollable events of nature and man do happen. Natural disasters such as hurricanes, storms, earthquakes, floods and volcanic explosions can strike fast and hard–wreaking havoc on homes, vehicles, roads, medical facilities and resource supply chains such as food, water, fuel, and electricity. When Hurricane Katrina struck the Southern US Coast just a few years ago, tens of thousands of people had to evacuate their homes with little warning. Unprepared and with no emergency plan, many of these people were completely dependent on scavenging and hand-outs while living in make-shift shelters–fending for themselves in a time of complete chaos and disorder. A 72-Hour Emergency Kit packed with survival essentials would have been an invaluable and priceless resource. In our unstable and unpredictable world economy, we would be foolish to think there is also no chance of a terrorist or military attack from forces domestic or foreign that could possibly force us to evacuate our own home. An act of war is not the only threat from man. Dams burst, power plants go down, pipelines explode, oil spills occur, and other man-made structures and facilities can fail, resulting in disaster. Outbreaks of sickness and disease could also warrant an evacuation.

    We cannot control when, where, or how disasters strike. But we can control how prepared we are to deal with a disaster. There is a fine line between order and chaos and sometimes that line can be measured in seconds. When every second counts, having a plan and the tools to see that plan through are crucial to survival. The Bug Out Bag is your #1 resource in your overall Bug Out Plan and may very well be your key to survival one day.

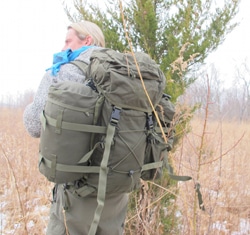
    There are 10 supply categories that need to be considered when assembling your Bug Out Bag. Before we dig into each of these categories it is important that I discuss the bag (or pack rather) itself. Your Bug Out Bag needs to be a backpack. It needs to be large enough and sturdy enough to contain the gear necessary to get you through 72 hours of independent survival. You need to be comfortable carrying it for extended periods of time. And, in my opinion, you don’t want to APPEAR TO BE PREPARED and STOCKED with gear. A ‘tricked-out-pack’ can make you a target of people who want the supplies that you have. Try not to let your pack send the message that you are stocked to the brim with all kinds of survival necessities. Keep it basic. I personally use a SnugPak Rocket Pack as my Bug Out Bag.

    Once you have chosen your pack, below are the 10 supply categories that need to be considered when assembling the contents of your Bug Out Bag:

    Category #1: WATER

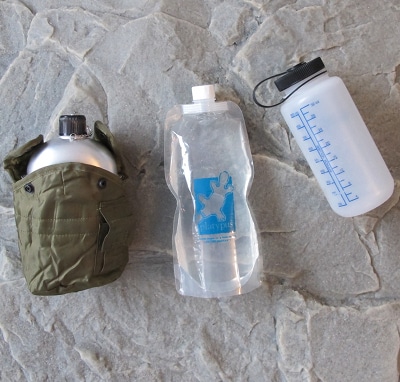
    You will need at least 1 liter of water per day for proper hydration–preferably more, especially considering hygiene concerns and certain weather conditions. Since this is a 72 Hour Survival Kit, that means it needs to contain 3 liters of fresh drinking water–minimum. This water should be stored in 2-3 durable containers with at least one of them being collapsible to reduce bulk as the water is used. A metal army canteen is another good choice because it can be used to boil drinking water that is collected ‘in the field’ if your immediate supply runs dry. I carry a collapsible Platypus water bottle, a 32 oz. Nalgene water bottle, and a metal US Army issue canteen.

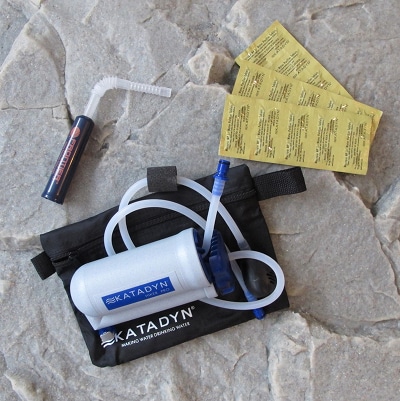
    Because water is so critical to survival, I highly recommended also packing at least 2 water purification options. Boiling water for 10 minutes is an option but is not always the most convenient. I suggest packing 1 water filtration system and also some water purification tablets. I personally pack a Katadyn Hiker Pro Filtration System, an Aquamira Survival Straw (as a backup) and sodium chlorite water purification tablets. The 3 options of boiling, filtering, and chemical treatment will give you more flexibility in securing one of your most basic survival needs: clean water.

    Category #2: FOOD

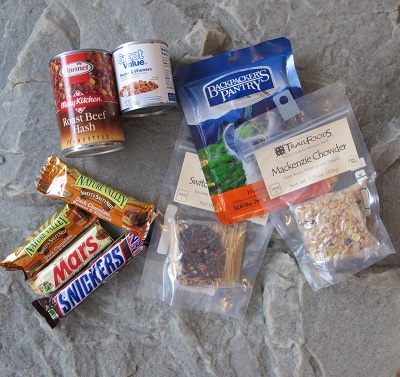
    Don’t worry about planning for three well balanced meals per day–this is survival, not vacation. I’ve gone on many survival trips where I haven’t eaten for a few days, so you can live without any food at all for 72 hours. However, it isn’t pleasant. You should pack simple & easy to prepare meals. Canned meats and beans are great options. Canned beef or chicken stews are equally as effective. If the weight of your Bug Out Bag is an issue, dehydrated camping meals are excellent choices. Remember, though, they require hot water to prepare–so that means a stove or fire and valuable time (if you are traveling). Military MREs are also good options. They have a long shelf-life, contain their own heating systems, and are very packable. They can be expensive, though. I would also suggest tossing in a few energy bars and candy bars. These are packed with calories and carbs–both of which are extremely important.

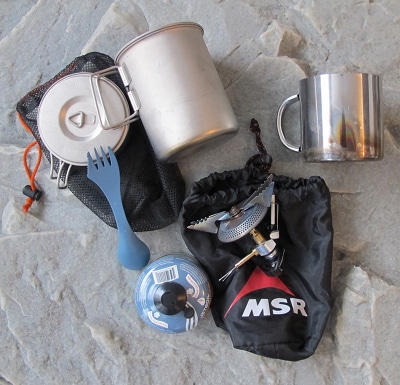
    When we discuss food, we also need to discuss preparing it. A very simple cooking kit is all you should need. It should contain at least 1 small metal pot, a spork, a metal cup and maybe a metal pan or plate. Anything more than this is overkill. In many instances, preparing food requires heat. A fire will always work but may not be practical in every situation. I would suggest packing a lightweight backpack stove with 1-3 fuel canisters. I’d rather have it and not need it than need it and not have it. I personally carry a self-igniting MSR Ultra light stove in my BOB with 1 fuel can.

    CATEGORY #3: SHELTER

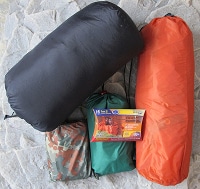
    I include clothing in this category. Regardless of climate, I recommend packing the following (some of these items can be on your body when you leave): 2 pair of wool hiking socks, 2 changes of underwear, 1 extra pair of pants (NOT BLUE JEANS AND PREFERABLY NOT 100% COTTON), 1 base layer thermal underwear, 1 warm fleece hat, 2 extra shirts (1 long sleeve, 1 short sleeve), 1 mid-weight fleece, 1 warm rain jacket, 1 heavy duty military poncho (can be found at any Army/Navy Surplus), 1 pair of comfortable waterproof hiking boots.

    What to pack for an actual shelter is a heavily debated topic within the survival community. I like having options and I like redundancy–especially when it comes to shelter. Protecting yourself from the elements, whether rain, cold, or heat, is incredibly important.

    Your first emergency shelter option is the military poncho listed above. These are designed with grommets in the corners to be used as a make-shift emergency tarp-tent and are actually quite effective. I’ve spent many nights in the woods during all kinds of weather conditions with nothing more than a wool blanket and a military poncho…and have been fairly comfortable. Practicing the set-up is the key. Know HOW to use it before you need to.

    A second emergency shelter option is a simple reflective emergency survival blanket. There are many different kinds and brands of these on the market. I prefer one from Adventure Medical Products called the Heatsheet. Not only can it be used as an emergency survival sleeping bag, but it can also be used as a ground tarp or as a tarp-tent shelter. These are lightweight and cheap.

    Besides the poncho and the heatsheet, I also carry a 6′x10′ waterproof rip-stop nylon tarp. I use this style of tarp as a year-round camping shelter, so I know it works. It’s lightweight and really effective if you practice setting it up. You can also bring a lightweight camping tent. These can be pricey, but they are really nice.

    Lastly, you will want to include a very packable sleeping bag. If I had to give a general degree rating I would say a safe bet is a 30-40 degree bag. This pretty much covers all of your bases. Sure, you’d be cold at 20 degrees, but you would live. If you have the room, a nice wool blanket is a great addition. Wool maintains 80% of its warming properties even when soaking wet and is a very durable survival fabric with incredible insulating properties.

    CATEGORY #4: FIRE

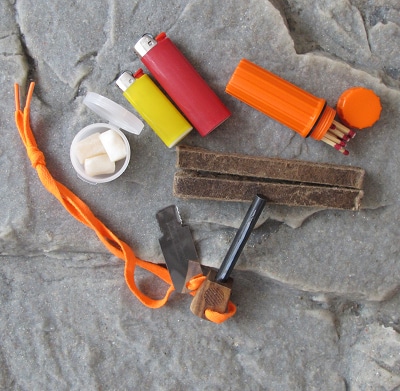
    Making fire is one of the most important survival skills of all time. You need a minimum of 3 ways to make fire. Because you are preparing this Bug Out Bag in advance, you can toss in a few of the easy options like lighters and waterproof matches. You will also want to include a fire steel which can generate sparks in any weather condition. Besides these items, you will need to pack some tinder for fueling your initial flame. You can buy tinder from any outdoor store, but cotton balls soaked in petroleum jelly is the best I’ve ever seen.

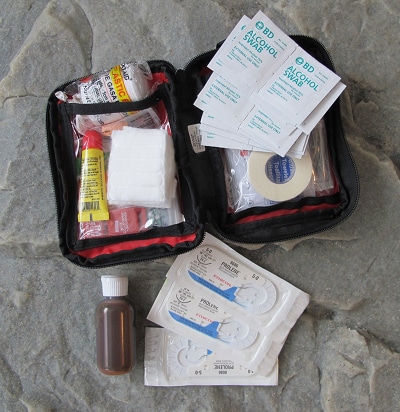
    CATEGORY #5: FIRST AID

    Whether you build your own kit from scratch or buy a premade kit, make sure it includes the following items at a minimum: 1″ x 3″ adhesive bandages (12), 2″ x 4.5″ adhesive bandages (2), adhesive knuckle bandages (3), butterfly closure bandages (2), gauze dressing.

    My personal gear for this category includes: Adventure Medical Kit’s First Aid Kit 1.0 and, I’ve added 3 suture kits, more alcohol pads, 2 rolls of 2″ gauze, CARMEX Lip Balm, and some larger butterfly bandages.

    CATEGORY #6: TOOLS

    The first and most important tool in your Bug Out Bag is a knife. Choosing your survival knife is a very personal decision, and besides your knowledge, it will undoubtedly be your most useful survival tool. I suggest carrying a full tang fixed blade all-purpose survival knife. It should be large enough to use for chopping, splitting, and self-defense but also small enough to use for more delicate camp chore tasks such as carving feather sticks and preparing food. The right balance is a personal decision. In my opinion the overall length needs to around 10″ –not too much over. Any larger than this and the knife becomes more difficult to use as an effective tool and starts to get bulky. I have made the decision to carry 2 knives in my Bug Out Bag. I carry a Ka-Bar US Army Military Fighting Knife and also a Mora 840 MG Clipper Knife which I use as a smaller all-around camp knife. Mora knives are very reliable all-around camp knives, and a good Mora can be purchased for under $15.

    Besides a knife, one other item you will want to consider is a good multi-tool. A multi-tool comes in handy for all types of projects–from cutting wire to complex mechanical chores. Your multi-tool should have a screwdriver (both phillips and flat-head), pliers, a knife blade, and wire cutters at a minimum. Leatherman makes all kinds of great multi-tools which can be purchased at almost any sporting goods store. I personally carry a Leatherman MUT Military Multi-tool.

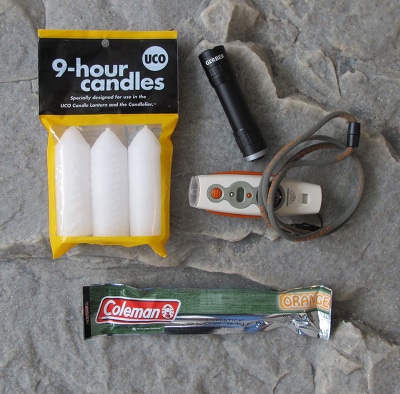
    CATEGORY #7: LIGHTING

    You need to pack at least 2 light sources. I would suggest having 1 flashlight that with throw light some distance like a mini mag light or a mini LED flashlight. The 2nd can be a smaller one to use around camp or while fixing meals, etc. Mini keychain LED lights are lightweight, cheap, and last a long time. Other ideas are glow-sticks, candles, and LED head-lamps. I personally carry the following light sources: Gerber Firecracker Flashlight, a lanyard multi-function tool with small LED light, 1 glow-stick & 1 package of 9 hour candles. Again, I like options.

    CATEGORY #8: COMMUNICATIONS

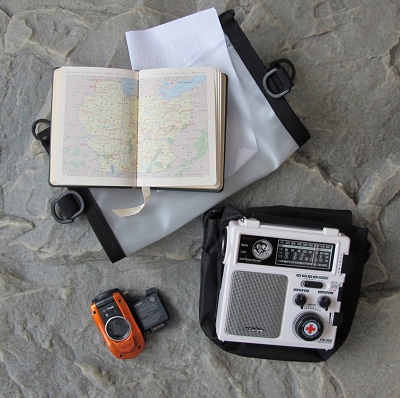
    A fully charged cell phone is at the top of this list. In an emergency, cell phone service will probably be jammed up. However, text messages typically still go through, so having a cell phone is a necessity. You should also have either a fully charger EXTRA cell phone battery or a means of charging your cell phone. There are several options for charging your phone in the field without electricity. Some include solar charging units, hand crank chargers, and aftermarket battery boosters. You need to research and determine which solution is best for your current phone make/model.

    In addition to a cell phone, you should also pack a small battery powered or crank powered AM/FM radio. This could be an important source of information and for the price and weight, you can’t go wrong. I personally carry a hand-crank FR-300 Emergency Radio. The hand-crank also has a cell phone charging feature.

    Under this category I will also include IMPORTANT DOCUMENTS. In the case of emergency evacuation, you should carry with you certain important documents. Among these should be your driver’s license, passport, social security card, medical information, important phone numbers and account numbers (bank, insurance, credit cards, etc.), and your gun carry permit.

    The last item in this category is to pack a detailed map of your surrounding area, your state, and any area in-between your location and your Bug Out Location (your predetermined destination in case you have to Bug Out). You would be foolish to depend on a GPS in an evacuation emergency. PACK MAPS!

    I personally carry all of these documents in a sealable waterproof map case.

    CATEGORY #9: PROTECTION & SELF-DEFENSE

    You can almost certainly guarantee that in an evacuation emergency there will be chaos and disorder. Events of this magnitude inevitably overwhelm normal police and public safety measures–at least for a short time. History tells us that rioting, looting, rape, and violent crimes will occur. You need to be prepared to protect and defend yourself and your resources–especially if you have a family. You would be naive not to take this category seriously. The best measure of self defense is a gun–period. Besides the intimidation factor, a gun has reach and stopping power. A gun can also be used for hunting if necessary. What kind of gun to pack is a lengthy topic all by itself. Some like shotguns, some prefer rifles, and others choose handguns. I have chosen to pack a 357 Ruger Revolver. I chose a handgun because it is easy to conceal and is fairly lightweight. I chose a 357 because of the stopping power, and I chose a revolver because I know beyond the shadow of a doubt that every time I pull the trigger a bullet will fire. I’ve had automatic pistols jam on me enough times to know I don’t want my life to depend on one.

    Other formidable weapons of self-defense can be your survival knife, a machete, or even a walking stick. I, though, would hate for anything except a gun to be the only thing between me and a gang of thugs.

    CATEGORY #10: MISC. GEAR

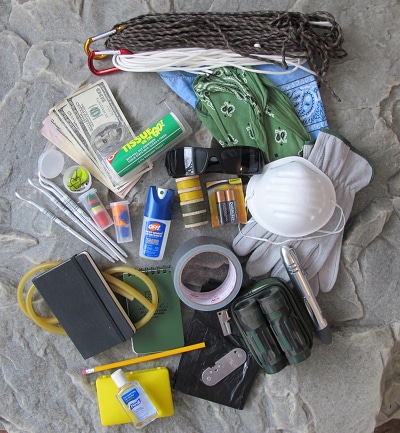
    Just in case you have to Bug Out on foot, the weight of your pack should always be a consideration. You should be comfortable carrying your pack for up to 3 days. Because of this, everyone’s pack load will vary depending on their comfort level. Below are some additional items that I have packed in my Bug Out Bag that you will also want to consider when building your own:

    • CASH – $1000 minimum (because cash talks)
    • Toilet paper
    • 200 feet of paracord (building shelter)
    • Duct tape (100s of uses)
    • 100 feet of Army issue trip wire (misc. projects, snares)
    • Pad of paper & pencil (leave notes or record information)
    • Small Bible
    • 2 Bandanas (because they are so dang multi-useful)
    • Leather work gloves
    • Small knife sharpener
    • Machete (clearing brush, chopping wood, self-defense)
    • 4 spare AA batteries for my Gerber Firecracker
    • 2 dust masks (can double as crude filters)
    • Bar of soap & small bottle of hand sanitizer (hygiene)
    • Travel toothbrush w/ tooth paste
    • 36″ length of rubber tubing (siphon, tourniquet)
    • Small sewing kit
    • 2 heavy duty 30 gallon garbage gags (water storage, shelter, poncho)
    • P38 can opener
    • Binoculars
    • Small fishing kit
    • Stakes
    • Sunglasses (can double as safety glasses)
    • Whistle
    • Insect repellent
    • Earplugs
    • Compass

    At the end of the day, there is no perfect Bug Out Bag. Even my own BOB changes and evolves with my needs, thoughts, wants, and tastes. An incomplete and imperfect Bug Out Bag is better than nothing at all in an emergency. For me, the peace of mind in knowing it’s there on the shelf to grab if I need it is reason enough to have taken the time, effort, and money to build it. I hope that my thoughts about the Bug Out Bag have been informative and helpful (and maybe inspirational) as you consider building your own.

    ____________________________________________________________________________

    Creek Stewart is a Senior Instructor at the Willow Haven Outdoor School for Survival, Preparedness & Bushcraft. Creek’s passion is teaching, sharing, and preserving outdoor living and survival skills. For more information, visit Willowhaven Outdoor.

    Thursday, March 17, 2011

    Sauced: Homemade Ketchup


    20110221-138909-homemade-ketchup.jpg

    Heinz has totally spoiled me. When Erin asked if I'd be interested in starting up this new "Sauced" column, I started racking my brain about what condiment to tackle first. I could think of nothing more fitting, more ubiquitous, than ketchup. You hardly ever stop to think about what goes into making ketchup. Usually, a bottle of Heinz is just hanging out in the fridge and, well, it tastes exactly the way it should.

    So I started this recipe from the ground up,
    reading ingredient labels on common ketchups, tasting them, and researching the process of making it. The fruits of this labor was something simple to make and tasted great.

    While nothing will replace a flavor so ingrained in our psyches as Heinz, this ketchup had its own appeal. It was brighter and fresher than bottled ketchup, with a natural tomato flavor that had just enough spice to clearly define itself as ketchup over any other tomato sauce. The wife and I enjoyed a plate of fries with this ketchup, alongside another dish with Heinz. We happily went back and forth between the two, appreciating each for its own uniqueness.

    About the author: Joshua Bousel brings you new, tasty condiment each Wednesday and a recipe for weekend grilling every Friday. He also writes about grilling and barbecue on his blog The Meatwave whenever he can be pulled away from his grill.

    Ingredients

    active time 1 - 1 1/2 hours,

    • 2 tablespoons olive oil
    • 1 medium onion, chopped medium
    • 1 clove garlic, minced
    • 1 28-oz can tomato purée
    • 1/2 cup packed dark brown sugar
    • 1/4 cup cider vinegar
    • 1 tablespoon tomato paste
    • 1/2 teaspoon kosher salt
    • 1/2 teaspoon ground mustard
    • 1/8 teaspoon ground cloves
    • 1/8 teaspoon allspice
    • 1/8 teaspoon cayenne pepper

    Procedures

    1. 1

      Heat oil in a medium saucepan over medium heat until shimmering. Add in the onion and cook, stirring occasionally, until softened but not browned, 5 to 8 minutes. Add in the garlic and stir until fragrant, about 30 seconds. Add the tomato purée, brown sugar, vinegar, tomato paste, salt, mustard, cloves, allspice, and cayenne pepper and stir to combine. Bring to a boil, then reduce heat to low and simmer, stirring occasionally, until thickened to the consistency of ketchup, 45 to 60 minutes.

    2. 2

      Place ketchup in the jar of a blender and purée until completely smooth.

    3. 3

      Wash and dry saucepan, then place a fine mesh strainer over top. Pour ketchup in the strainer and, using a spatula, force through all of the ketchup.

    4. 4

      Taste ketchup and adjust seasonings if necessary. Pour ketchup into a jar, seal, and store in the refrigerator for 3 weeks up to a month.

    Wednesday, March 09, 2011

    Top Ten Signs You're a Fundamentalist Christian


    10 - You vigorously deny the existence of thousands of gods claimed by other religions, but feel outraged when someone denies the existence of yours.

    9 - You feel insulted and "dehumanized" when scientists say that people evolved from other life forms, but you have no problem with the Biblical claim that we were created from dirt.

    8 - You laugh at polytheists, but you have no problem believing in a Triune God.

    7 - Your face turns purple when you hear of the "atrocities" attributed to Allah, but you don't even flinch when hearing about how God/Jehovah slaughtered all the babies of Egypt in "Exodus" and ordered the elimination of entire ethnic groups in "Joshua" including women, children, and trees!

    6 - You laugh at Hindu beliefs that deify humans, and Greek claims about gods sleeping with women, but you have no problem believing that the Holy Spirit impregnated Mary, who then gave birth to a man-god who got killed, came back to life and then ascended into the sky.

    5 - You are willing to spend your life looking for little loopholes in the scientifically established age of Earth (few billion years), but you find nothing wrong with believing dates recorded by Bronze Age tribesmen sitting in their tents and guessing that Earth is a few generations old.

    4 - You believe that the entire population of this planet with the exception of those who share your beliefs -- though excluding those in all rival sects - will spend Eternity in an infinite Hell of Suffering. And yet consider your religion the most "tolerant" and "loving."


    3 - While modern science, history, geology, biology, and physics have failed to convince you otherwise, some idiot rolling around on the floor speaking in "tongues" may be all the evidence you need to "prove" Christianity.

    2 - You define 0.01% as a "high success rate" when it comes to answered prayers. You consider that to be evidence that prayer works. And you think that the remaining 99.99% FAILURE was simply the will of God.

    1 - You actually know a lot less than many atheists and agnostics do about the Bible, Christianity, and church history - but still call yourself a Christian.

    Friday, March 04, 2011

    You Are Going To Hell If You....


    * eat fruit from a tree less than five years old. [Lev. 19:23]
    * cross-breed animals. [Lev. 19:19]
    * grow two different plants in your garden. [Lev. 19:19]
    * wear a cotton-polyester blend T-Shirt. [Lev. 19:19]
    * read your horoscope. [Lev. 19:26]
    * consult a psychic. [Lev. 19:31]
    * cut your hair. [Lev. 19:27]
    * trim your beard. [Lev. 19:27]
    * are tatooed. [Lev. 19:28]
    * plant crops for more than seven years. [Lev. 25:4, Ex. 23:10-13]
    * bear a grudge. [Lev. 19:17]
    * collect interest on a loan. [Ex. 22:24]
    * insult a leader. [Ex. 22:27]
    * mistreat a foreigner. [Ex. 22:21, 23:9]
    * spread false rumors. [Ex. 23:1] (Sorry, Pat Robertson!)
    * drive a Mercury. [Ex. 23:13] (Look it up.)

    Don’t End Agricultural Subsidies, Fix Them


    March 1, 2011, 8:53 pm

    Mark BittmanMark Bittman on food and all things related.

    Agricultural subsidies have helped bring us high-fructose corn syrup, factory farming, fast food, a two-soda-a-day habit and its accompanying obesity, the near-demise of family farms, monoculture and a host of other ills.

    Yet — like so many government programs — what subsidies need is not the ax, but reform that moves them forward. Imagine support designed to encourage a resurgence of small- and medium-size farms producing not corn syrup and animal-feed but food we can touch, see, buy and eat — like apples and carrots — while diminishing handouts to agribusiness and its political cronies.

    Farm subsidies were created in an attempt to ameliorate the effects of the Great Depression, which makes it ironic that in an era when more Americans are suffering financially than at any time since, these subsidies are mostly going to those who need them least.

    That wasn’t the plan, of course. In the 1930s, prices were fixed on a variety of commodities, and some farmers were paid to reduce their crop yields. The program was supported by a tax on processors of food — now there’s a precedent! — and was intended to be temporary. It worked, sort of: prices rose and more farmers survived. But land became concentrated in the hands of fewer farmers, and agribusiness was born, and along with it the sad joke that the government paid farmers for not growing crops.

    The farm bill, up for renewal in 2012, includes an agricultural subsidy portion worth up to $30 billion, $5 billion of which is what you might call handouts, direct payments to farmers.

    The subsidy-suckers don’t grow the fresh fruits and vegetables that should be dominating our diet. Indeed, if all Americans decided to actually eat the five servings a day of fruits and vegetables that are recommended, they would discover that American agriculture isn’t set up to meet that need. They grow what they’re paid to grow: corn, soy, wheat, cotton and rice.

    The first two of these are the pillars for the typical American diet — featuring an unnaturally large consumption of meat, never-before-seen junk food and a bizarre avoidance of plants — as well as the fortunes of Pepsi, Dunkin’ Donuts, KFC and the others that have relied on cheap corn and soy to build their empires of unhealthful food. Over the years, prices of fresh produce have risen, while those of meat, poultry, sweets, fats and oils, and especially soda, have fallen. (Tom Philpott, writing in the environment and food Web site Grist and citing a Tufts University study, reckons that between 1997 and 2005 subsidies saved chicken, pork, beef and HFCS producers roughly $26.5 billion. In the short term, that saved consumers money too — prices for these foods are unjustifiably low — but at what cost to the environment, our food choices and our health?)

    Eliminating the $5 billion in direct agricultural payments would level the playing field for farmers who grow non-subsidized crops, but just a bit — perhaps not even noticeably. There would probably be a decrease in the amount of HFCS in the market, in the 10 billion animals we “process” annually, in the ethanol used to fill gas-guzzlers and in the soy from which we chemically extract oil for frying potatoes and chicken. Those are all benefits, which we could compound by taking those billions and using them for things like high-speed rail, fulfilling our promises to public workers, maintaining Pell grants for low-income college students or any other number of worthy, forward-thinking causes.

    But let’s not kid ourselves. Although the rage for across-the-board spending cuts doesn’t extend to the public — according to a recent Pew poll, most people want no cuts or even increased spending in major areas — once the $5 billion is gone, it’s not coming back.

    That the current system is a joke is barely arguable: wealthy growers are paid even in good years, and may receive drought aid when there’s no drought. It’s become so bizarre that some homeowners lucky enough to have bought land that once grew rice now have subsidized lawns. Fortunes have been paid to Fortune 500 companies and even gentlemen farmers like David Rockefeller.

    Thus even House Speaker Boehner calls the bill a “slush fund”; the powerful Iowa Farm Bureau suggests that direct payments end; and Glenn Beck is on the bandwagon. (This last should make you suspicious.) Not surprisingly, many Tea Partiers happily accept subsidies, including Vicky Hartzler (R-MO, $775,000), Stephen Fincher (R-TN, $2.5 million) and Michele Bachmann (R-MN $250,000). No hypocrisy there.

    Left and right can perhaps agree that these are payments we don’t need to make. But suppose we use this money to steer our agriculture — and our health — in the right direction. A Gallup poll indicates that most Americans oppose cutting aid to farmers, and presumably they’re not including David Rockefeller or Michele Bachmann in that protected group; we still think of farmers as stewards of the land, and the closer that sentiment is to reality the better off we’ll be.

    By making the program more sensible the money could benefit us all. For example, it could:

    • Fund research and innovation in sustainable agriculture, so that in the long run we can get the system on track.

    • Provide necessary incentives to attract the 100,000 new farmers Secretary of Agriculture Vilsack claims we need.

    • Save more farmland from development.

    • Provide support for farmers who grow currently unsubsidized fruits, vegetables and beans, while providing incentives for monoculture commodity farmers to convert some of their operations to these more desirable foods.

    • Level the playing field so that medium-sized farms — big enough to supply local supermarkets but small enough to care what and how they grow — can become more competitive with agribusiness.

    The point is that this money, which is already in the budget, could encourage the development of the kind of agriculture we need, one that prioritizes caring for the land, the people who work it and the people who need the real food that’s grown on it.

    We could, of course, finance or even augment the program with new monies, by taking a clue from the ‘30s, when the farm subsidy program began: Let the food giants that have profited so mightily and long from cheap corn and soy — that have not so far been asked to share the pain — pay for it.

    Visit my blog, where you can find out more about my last column, or what I just cooked. You can also join me on Facebook or Twitter.